Importing images
Supported image formats
Godot can import the following image formats:
BMP (
.bmp)- No support for 16-bit per pixel images. Only 1-bit, 4-bit, 8-bit, 24-bit, and 32-bit per pixel images are supported.
DirectDraw Surface (
.dds)- If mipmaps are present in the texture, they will be loaded directly. This can be used to achieve effects using custom mipmaps.
Khronos Texture (
.ktx)- Decoding is done using libktx. Only supports 2D images. Cubemaps, texture arrays and de-padding are not supported.
OpenEXR (
.exr)- Supports HDR (highly recommended for panorama skies).
Radiance HDR (
.hdr)- Supports HDR (highly recommended for panorama skies).
JPEG (
.jpg,.jpeg)- Doesn't support transparency per the format's limitations.
PNG (
.png)- Precision is limited to 8 bits per channel upon importing (no HDR images).
Truevision Targa (
.tga)SVG (
.svg)- SVGs are rasterized using ThorVG when importing them. Support is limited; complex vectors may not render correctly. Importing SVG images with text; otherwise, it won't appear in the rasterized image. You can check whether ThorVG can render a certain vector correctly using its web-based viewer. For complex vectors, rendering them to PNGs using Inkscape is often a better solution. This can be automated thanks to its command-line interface.
WebP (
.webp)- WebP files support transparency and can be compressed lossily or losslessly. The precision is limited to 8 bits per channel.
INFO
If you've compiled the Godot editor from source with specific modules disabled, some formats may not be available.
Importing textures
The default action in Godot is to import images as textures. Textures are stored in video memory. Their pixel data can't be accessed directly from the CPU without converting them back to an Image in a script. This is what makes drawing them efficient.
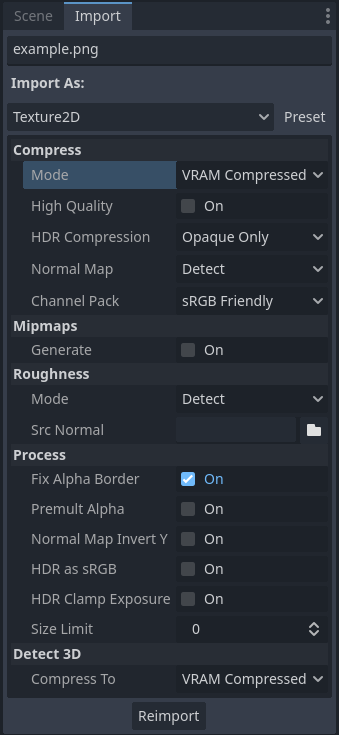
There are over a dozen import options that can be adjusted after selecting an image in the FileSystem dock:

Import options in the Import dock after selecting an image in the FileSystem dock. Some of these options are only visible with certain compression modes.
Changing import type
It is possible to choose other types of imported resources in the Import dock:
BitMap: 1-bit monochrome texture (intended to be used as a click mask in TextureButton and TouchScreenButton). This resource type cannot be displayed directly onto 2D or 3D nodes, but the pixel values can be queried from a script using get_bit.
Cubemap: Import the texture as a 6-sided cubemap, with interpolation between the cubemap's sides (seamless cubemaps), which can be sampled in custom shaders.
CubemapArray: Import the texture as a collection of 6-sided cubemaps, which can be sampled in custom shaders. This resource type can only be displayed when using the Forward+ or Mobile renderers, not the Compatibility renderer.
Font Data (Monospace Image Font): Import the image as a bitmap font where all characters have the same width. See Using Fonts.
Image: Import the image as-is. This resource type cannot be displayed directly onto 2D or 3D nodes, but the pixel values can be queried from a script using get_pixel.
Texture2D: Import the image as a 2-dimensional texture, suited for display on 2D and 3D surfaces. This is the default import mode.
Texture2DArray: Import the image as a collection of 2-dimensional textures. Texture2DArray is similar to a 3-dimensional texture, but without interpolation between layers. Built-in 2D and 3D shaders cannot display texture arrays, so you must create a custom shader in CanvasItem shaders or Spatial shaders to display a texture from a texture array.
Texture3D: Import the image as a 3-dimensional texture. This is not a 2D texture applied onto a 3D surface. Texture3D is similar to a texture array, but with interpolation between layers. Texture3D is typically used for FogMaterial density maps in Volumetric fog and fog volumes, 3D Particle attractors vector fields, Environment 3D LUT color correction, and custom shaders.
TextureAtlas: Import the image as an atlas of different textures. Can be used to reduce memory usage for animated 2D sprites. Only supported in 2D due to missing support in built-in 3D shaders.
For Cubemap, the expected image order is X+, X-, Y+, Y-, Z+, Z- (in Godot's coordinate system, so Y+ is "up" and Z- is "forward"). Here are templates you can use for cubemap images (right-click > Save Link As…):
Detect 3D
The default import options (no mipmaps and Lossless compression) are suited for 2D, but are not ideal for most 3D projects. Detect 3D makes Godot aware of when a texture is used in a 3D scene (such as a texture in a BaseMaterial3D). If this happens, several import options are changed so the texture flags are friendlier to 3D. Mipmaps are enabled and the compression mode is changed to VRAM Compressed unless Detect 3D > Compress To is changed. The texture is also reimported automatically.
A message is printed to the Output panel when a texture is detected to be used in 3D.
If you run into quality issues when a texture is detected to be used in 3D (e.g. for pixel art textures), change the Detect 3D > Compress To option before using the texture in 3D, or change Compress > Mode to Lossless after using the texture in 3D. This is preferable to disabling Detect 3D, as mipmap generation remains enabled to prevent textures from looking grainy at a distance.
Import options
INFO
In Godot 4.0, changing the texture filter and repeat mode is no longer done in the import options.
Instead, texture filter and repeat modes are changed in the CanvasItem properties in 2D (with a project setting acting as a default), and in a Sampling. In custom shaders, filter and repeat mode is changed on the sampler2D uniform using hints described in the Shading language documentation.
Compress > Mode
Images are one of the largest assets in a game. To handle them efficiently, they need to be compressed. Godot offers several compression methods, depending on the use case.
Lossless: This is the default and most common compression mode for 2D assets. It shows assets without any kind of artifacting, and disk compression is decent. It will use considerably more amount of video memory than VRAM Compression, though. This is also the recommended setting for pixel art.
Lossy: This is a good choice for large 2D assets. It has some artifacts, but less than VRAM compression and the file size is several times lower compared to Lossless or VRAM Uncompressed. Video memory usage isn't decreased by this mode; it's the same as with Lossless or VRAM Uncompressed.
VRAM Compressed: This is the default and most common compression mode for 3D assets. Size on disk is reduced and video memory usage is also decreased considerably (usually by a factor between 4 and 6). This mode should be avoided for 2D as it exhibits noticeable artifacts, especially for lower-resolution textures.
VRAM Uncompressed: Only useful for formats that can't be compressed, such as raw floating-point images.
Basis Universal: This alternative VRAM compression mode encodes the texture to a format that can be transcoded to most GPU-compressed formats at load-time. This provides very small files that make use of VRAM compression, at the cost of lower quality compared to VRAM Compressed and slow compression times. VRAM usage is usually the same as VRAM Compressed. Basis Universal does not support floating-point image formats (the engine will internally fall back to VRAM Compressed instead).
INFO
Even in 3D, "pixel art" textures should have VRAM compression disabled as it will negatively affect their appearance, without improving performance significantly due to their low resolution.
In this table, each of the 5 options are described together with their advantages and disadvantages ( = best,
= worst):
| Compress mode | Lossless | Lossy | VRAM Compressed | VRAM Uncompressed | Basis Universal |
|---|---|---|---|---|---|
| Description | Stored as Lossless WebP / PNG | Stored as Lossy WebP | Stored as S3TC, BPTC or ETC2 depending on platform | Stored as raw pixels | Transcoded to VRAM Compressed format |
| Size on disk | |||||
| Memory usage | |||||
| Performance | |||||
| Quality loss | |||||
| Load time |
Estimated memory usage for a single RGBA8 texture with mipmaps enabled:
| Texture size | Lossless | Lossy | VRAM Compressed | VRAM Uncompressed | Basis Universal |
|---|---|---|---|---|---|
| 128×128 | |||||
| 256×256 | |||||
| 512×512 | |||||
| 1024×1024 | |||||
| 2048×2048 | |||||
| 4096×4096 |
INFO
In the above table, memory usage will be reduced by 25% for images that do not have an alpha channel (RGB8). Memory usage will be further decreased by 25% for images that have mipmaps disabled.
Notice how at larger resolutions, the impact of VRAM compression is much greater. With a 4:1 compression ratio (6:1 for opaque textures with S3TC), VRAM compression effectively allows a texture to be twice as large on each axis, while using the same amount of memory on the GPU.
VRAM compression also reduces the memory bandwidth required to sample the texture, which can speed up rendering in memory bandwidth-constrained scenarios (which are frequent on integrated graphics and mobile). These factors combined make VRAM compression a must-have for 3D games with high-resolution textures.
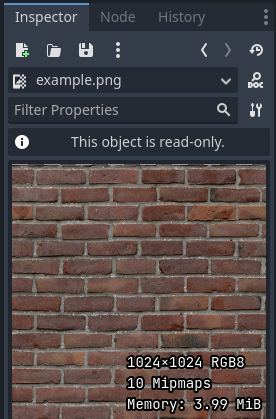
You can preview how much memory a texture takes by double-clicking it in the FileSystem dock, then looking at the Inspector:

Previewing a texture in the Inspector. Credit: Red Brick 03 - Poly Haven
Compress > High Quality
INFO
High-quality VRAM texture compression is only supported in the Forward+ and Mobile renderers.
When using the Compatibility renderer, this option is always considered disabled.
If enabled, uses BPTC compression on desktop platforms and ASTC (Adaptive Scalable Texture Compression) compression on mobile platforms. When using BPTC, BC7 is used for SDR textures and BC6H is used for HDR textures.
If disabled (default), uses the faster but lower-quality S3TC compression on desktop platforms and ETC2 on mobile/web platforms. When using S3TC, DXT1 (BC1) is used for opaque textures and DXT5 (BC3) is used for transparent or normal map (RGTC) textures.
BPTC and ASTC support VRAM compression for HDR textures, but S3TC and ETC2 do not (see HDR Compression below).
Compress > HDR Compression
INFO
This option only has an effect on textures that are imported as HDR formats in Godot (.hdr and .exr files).
If set to Disabled, never uses VRAM compression for HDR textures, regardless of whether they're opaque or transparent. Instead, the texture is converted to RGBE9995 (9-bits per channel + 5-bit exponent = 32 bits per pixel) to reduce memory usage compared to a half-float or single-precision float image format.
If set to Opaque Only (default), only uses VRAM compression for opaque HDR textures. This is due to a limitation of HDR formats, as there is no VRAM-compressed HDR format that supports transparency at the same time.
If set to Always, will force VRAM compression even for HDR textures with an alpha channel. To perform this, the alpha channel is discarded on import.
Compress > Normal Map
When using a texture as normal map, only the red and green channels are required. Given regular texture compression algorithms produce artifacts that don't look that nice in normal maps, the RGTC compression format is the best fit for this data. Forcing this option to Enable will make Godot import the image as RGTC compressed. By default, it's set to Detect. This means that if the texture is ever detected to be used as a normal map, it will be changed to Enable and reimported automatically.
Note that RGTC compression affects the resulting normal map image. You will have to adjust custom shaders that use the normal map's blue channel to take this into account. Built-in material shaders already ignore the blue channel in a normal map (regardless of the actual normal map's contents).
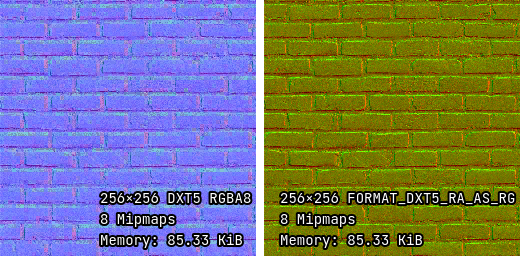
In the example below, the normal map with RGTC compression is able to preserve its detail much better, while using the same amount of memory as a standard RGBA VRAM-compressed texture:

Normal map with standard VRAM compression (left) and with RGTC VRAM compression (right)
INFO
Godot requires the normal map to use the X+, Y+ and Z+ coordinates, which is known as an OpenGL-style normal map. If you've imported a material made to be used with another engine, it may be DirectX-style. In this case, the normal map needs to be converted by enabling the Normal Map Invert Y import option.
More information about normal maps (including a coordinate order table for popular engines) can be found here.
Compress > Channel Pack
If set to sRGB Friendly (default), prevents the RG color format from being used as it does not support sRGB color.
If set to Optimized, allows the RG color format to be used if the texture does not use the blue channel.
A third option Normal Map (RG Channels) is only available in layered textures (Cubemap, CubemapArray, Texture2DArray and Texture3D). This forces all layers from the texture to be imported with the RG color format, with only the red and green channels preserved. RGTC compression is able to preserve its detail much better, while using the same amount of memory as a standard RGBA VRAM-compressed texture. This only has an effect on textures with the VRAM Compressed or Basis Universal compression modes.
Mipmaps > Generate
If enabled, smaller versions of the texture are generated on import. For example, a 64×64 texture will generate 6 mipmaps (32×32, 16×16, 8×8, 4×4, 2×2, 1×1). This has several benefits:
Textures will not become grainy in the distance (in 3D), or if scaled down due to camera zoom or CanvasItem scale (in 2D).
Performance will improve if the texture is displayed in the distance, since sampling smaller versions of the original texture is faster and requires less memory bandwidth.
The downside of mipmaps is that they increase memory usage by roughly 33%.
It's recommended to enable mipmaps in 3D. However, in 2D, this should only be enabled if your project visibly benefits from having mipmaps enabled. If the camera never zooms out significantly, there won't be a benefit to enabling mipmaps but memory usage will increase.
Mipmaps > Limit
WARNING
Mipmaps > Limit is currently not implemented and has no effect when changed.
If set to a value greater than -1, limits the maximum number of mipmaps that can be generated. This can be decreased if you don't want textures to become too low-resolution at extreme distances, at the cost of some graininess.
Roughness > Mode
The color channel to consider as a roughness map in this texture. Only effective if Roughness > Src Normal is not empty.
Roughness > Src Normal
The path to the texture to consider as a normal map for roughness filtering on import. Specifying this can help decrease specular aliasing slightly in 3D.
Roughness filtering on import is only used in 3D rendering, not 2D.
Process > Fix Alpha Border
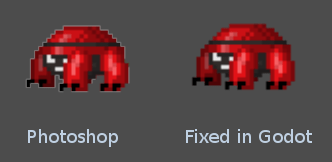
This puts pixels of the same surrounding color in transition from transparent to opaque areas. For textures displayed with bilinear filtering, this helps mitigate the outline effect when exporting images from an image editor.

It's recommended to leave this enabled (as it is by default), unless this causes issues for a particular image.
Process > Premult Alpha
An alternative to fixing darkened borders with Fix Alpha Border is to use premultiplied alpha. By enabling this option, the texture will be converted to this format. A premultiplied alpha texture requires specific materials to be displayed correctly:
In 2D, a CanvasItemMaterial will need to be created and configured to use the Premul Alpha blend mode on CanvasItems that use this texture. In CanvasItem shaders,
render_mode blend_premul_alpha;should be used.In 3D, a BaseMaterial3D will need to be created and configured to use the Premul Alpha blend mode on materials that use this texture. In Spatial shaders,
render_mode blend_premul_alpha;should be used.
Process > Normal Map Invert Y
Godot requires the normal map to use the X+, Y+ and Z+ coordinates, which is known as an OpenGL-style normal map. If you've imported a material made to be used with another engine, it may be DirectX-style. In this case, the normal map needs to be converted by enabling the Normal Map Invert Y import option.
More information about normal maps (including a coordinate order table for popular engines) can be found here.
Process > HDR as sRGB
Some HDR images you can find online may be broken and contain sRGB color data (instead of linear color data). It is advised not to use those files. If you absolutely have to, enabling this option on will make them look correct.
WARNING
Enabling HDR as sRGB on well-formatted HDR images will cause the resulting image to look too dark, so leave this disabled if unsure.
Process > HDR Clamp Exposure
Some HDR panorama images you can find online may contain extremely bright pixels, due to being taken from real life sources without any clipping.
While these HDR panorama images are accurate to real life, this can cause the radiance map generated by Godot to contain sparkles when used as a background sky. This can be seen in material reflections (even on rough materials in extreme cases). Enabling HDR Clamp Exposure can resolve this using a smart clamping formula that does not introduce visible clipping – glow will keep working when looking at the background sky.
Process > Size Limit
If set to a value greater than 0, the size of the texture is limited on import to a value smaller than or equal to the value specified here. For non-square textures, the size limit affects the longer dimension, with the shorter dimension scaled to preserve aspect ratio. Resizing is performed using cubic interpolation.
This can be used to reduce memory usage without affecting the source images, or avoid issues with textures not displaying on mobile/web platforms (as these usually can't display textures larger than 4096×4096).
Detect 3D > Compress To
This changes the Compress > Mode option that is used when a texture is detected as being used in 3D.
Changing this import option only has an effect if a texture is detected as being used in 3D. Changing this to Disabled then reimporting will not change the existing compress mode on a texture (if it's detected to be used in 3D), but choosing VRAM Compressed or Basis Universal will.
SVG > Scale
This is only available for SVG images.
The scale the SVG should be rendered at, with 1.0 being the original design size. Higher values result in a larger image. Note that unlike font oversampling, this affects the physical size the SVG is rendered at in 2D. See also Editor > Scale With Editor Scale below.
Editor > Scale With Editor Scale
This is only available for SVG images.
If true, scales the imported image to match the editor's display scale factor. This should be enabled for editor plugin icons and custom class icons, but should be left disabled otherwise.
Editor > Convert Colors With Editor Theme
This is only available for SVG images.
If checked, converts the imported image's colors to match the editor's icon and font color palette. This assumes the image uses the exact same colors as Editor icons, with the source file designed for a dark editor theme. This should be enabled for editor plugin icons and custom class icons, but should be left disabled otherwise.
Importing SVG images with text
As the SVG library used in Godot doesn't support rasterizing text found in SVG images, text must be converted to a path first. Otherwise, text won't appear in the rasterized image.
There are two ways to achieve this in a non-destructive manner, so you can keep editing the original text afterwards:
Select your text object in Inkscape, then duplicate it in place by pressing
Ctrl + Dand use Path > Object to Path. Hide the original text object afterwards using the Layers and Objects dock.Use the Inkscape command line to export an SVG from another SVG file with text converted to paths:
inkscape --export-text-to-path --export-filename svg_with_text_converted_to_path.svg svg_with_text.svgBest practices
Supporting high-resolution texture sizes in 2D without artifacts
To support Multiple resolutions with crisp visuals at high resolutions, you will need to use high-resolution source images (suited for the highest resolution you wish to support without blurriness, which is typically 4K in modern desktop games).
There are 2 ways to proceed:
Use a high base resolution in the project settings (such as 4K), then use the textures at original scale. This is an easier approach.
Use a low base resolution in the project settings (such as 1080p), then downscale textures when using them. This is often more difficult and can make various calculations in script tedious, so the approach described above is recommended instead.
After doing this, you may notice that textures become grainy at lower viewport resolutions. To resolve this, enable Mipmaps on textures used in 2D in the Import dock. This will increase memory usage.
Enabling mipmaps can also make textures appear blurrier, but you can choose to make textures sharper (at the cost of some graininess) by setting Rendering > Textures > Default Filters > Texture Mipmap Bias to a negative value.
Use appropriate texture sizes in 3D
While there's no "one size fits all" recommendation, here are some general recommendations for choosing texture sizes in 3D:
The size of a texture should be adjusted to have a consistent texel density compared to surrounding objects. While this cannot be ensured perfectly when sticking to power-of-two texture sizes, it's usually possible to keep texture detail fairly consistent throughout a 3D scene.
The smaller the object appears on screen, the smaller its texture should be. For example, a tree that only appears in the background doesn't need a texture resolution as high as other objects the player may be able to walk close to.
Using power-of-two texture sizes is recommended, but is not required. Textures don't have to be square – sizes such as 1024×512 are acceptable.
There are diminishing returns to using large texture sizes, despite the increased memory usage and loading times. Most modern 3D games not using a pixel art style stick to 2048×2048 textures on average, with 1024×1024 and 512×512 for textures spanning smaller surfaces.
When working with physically-based materials in 3D, you can reduce memory usage and file size without affecting quality too much by using a lower resolution for certain texture maps. This works especially well for textures that only feature low-frequency detail (such as a normal map for a snow texture).
If you have control over how the 3D models are created, these tips are also worth exploring:
When working with 3D models that are mostly symmetrical, you may be able to use mirrored UVs to double the effective texel density. This may look unnatural when used on human faces though.
When working with 3D models using a low-poly style and plain colors, you can rely on vertex colors instead of textures to represent colors on the model's surfaces.
INFO
Images can be loaded and saved at runtime using Images, including from an exported project.