Importing translations
Games and internationalization
The gaming community isn't monolingual or monocultural. It's made up of many different languages and cultures - just like the Godot community! If you want to allow players to experience your game in their language, one of things you'll need to provide is text translations, which Godot supports via internationalized text.
In regular desktop or mobile applications, internationalized text is usually located in resource files (or .po files for GNU stuff). Games, however, can use several orders of magnitude more text than applications, so they must support efficient methods for dealing with loads of multilingual text.
There are two approaches to generate multilingual language games and applications. Both are based on a key:value system. The first is to use one of the languages as the key (usually English), the second is to use a specific identifier. The first approach is probably easier for development if a game is released first in English, later in other languages, but a complete nightmare if working with many languages at the same time.
In general, games use the second approach and a unique ID is used for each string. This allows you to revise the text while it is being translated to other languages. The unique ID can be a number, a string, or a string with a number (it's just a unique string anyway).
INFO
If you need a more powerful file format, Godot also supports loading translations written in the gettext .po format. See Localization using gettext for details.
Translation format
To complete the picture and allow efficient support for translations, Godot has a special importer that can read CSV files. Most spreadsheet editors can export to this format, so the only requirement is that the files have a special arrangement. The CSV files must be saved with UTF-8 encoding without a byte order mark.
CSV files must be formatted as follows:
| keys | <lang1> | <lang2> | <langN> |
|---|---|---|---|
| KEY1 | string | string | string |
| KEY2 | string | string | string |
| KEYN | string | string | string |
The "lang" tags must represent a language, which must be one of the Locale codes supported by the engine, or they must start with an underscore (_), which means the related column is served as comment and won't be imported. The "KEY" tags must be unique and represent a string universally (they are usually in uppercase, to differentiate from other strings). These keys will be replaced at runtime by the matching translated string. Note that the case is important, "KEY1" and "Key1" will be different keys. The top-left cell is ignored and can be left empty or having any content. Here's an example:
| keys | en | es | ja |
|---|---|---|---|
| GREET | Hello, friend! | Hola, amigo! | |
| ASK | How are you? | Cómo está? | |
| BYE | Goodbye | Adiós | |
| QUOTE | "Hello" said the man. | "Hola" dijo el hombre. |
The same example is shown below as a comma-separated plain text file, which should be the result of editing the above in a spreadsheet. When editing the plain text version, be sure to enclose with double quotes any message that contains commas, line breaks or double quotes, so that commas are not parsed as delimiters, line breaks don't create new entries and double quotes are not parsed as enclosing characters. Be sure to escape any double quotes a message may contain by preceding them with another double quote. Alternatively, you can select another delimiter than comma in the import options.
keys,en,es,ja
GREET,"Hello, friend!","Hola, amigo!",こんにちは
ASK,How are you?,Cómo está?,元気ですか
BYE,Goodbye,Adiós,さようなら
QUOTE,"""Hello"" said the man.","""Hola"" dijo el hombre.",「こんにちは」男は言いました
CSV importer
Godot will treat CSV files as translations by default. It will import them and generate one or more compressed translation resource files next to it.
Importing will also add the translation to the list of translations to load when the game runs, specified in project.godot (or the project settings). Godot allows loading and removing translations at runtime as well.
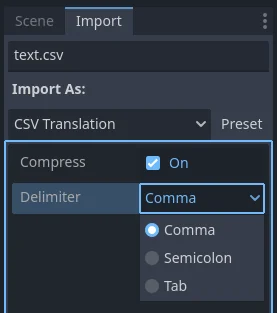
Select the .csv file and access the Import dock to define import options. You can toggle the compression of the imported translations, and select the delimiter to use when parsing the CSV file.

Be sure to click Reimport after any change to these options.